

Self-Support Kayaking: A How To
Matt GerhardtA guide to planning and executing self-support kayaking trips
Self-support kayaking is often looked upon as something that only the most experienced and dedicated kayakers undertake. But, self-support trips are something that even novice kayakers can undertake with proper gear and planning. The glory of self-support is the simplicity and efficiency, especially compared to more gear-intensive raft trips. Self-support trips are often faster, and provide more opportunities to camp in places that wouldn’t be feasible in a raft, or give you access to more difficult to access side-canyon hikes. With a little bit of preparation and practice, just about anyone can enjoy a multi-day kayak trip. This guide will give you some tools to plan and execute your own self-support kayak trip.
– Planning –
Planning is possibly the most important aspect of any trip. You will want to spend ample time making sure that you are fully prepared for your trip. I find that making itemized Google Doc spreadsheet lists is extremely helpful with trip planning. They are easy to share, collaborate on and are easily saved and updated from trip to trip. They are also great for documenting trip expenses or group gear checklists.
• Gear:
The first thing you’ll need to itemize is your gear. I like to break it down into three lists: kayaking gear, camping gear and clothing. Kayaking gear will mainly consist of gear that you would use on any river trip: kayak, paddle, skirt, helmet, pfd, river shoes, throwbag, etc. Drysuits are almost mandatory on self-support trips because of their added safety and comfort benefits. Bring a repair kit with basics like duct tape, super glue, Aquaseal, Tenacious Tape, spare gaskets, spare outfitting bolts and screws, bituthene or Quick-Patch.
When choosing your kayak, choose something big enough to fit you and all your gear, but small enough to maneuver if you’re headed on a low-water or technical river. On our trip, our group chose to paddle boats like the Dagger Katana 10.4, Jackson Karma Traverse 10 and Karma RG, and the Dagger Green Boat. Check out our Expedition Whitewater Kayak page for more examples.
Check for any regulations in the area you’ll be paddling. Make sure that you have all the required gear and that all of it is up to code. One member of our group had his PFD rejected at Lee’s Ferry because the ranger couldn’t read one number of the serial number. Luckily, we had thrown a few extra in the shuttle van.
When it comes to camping gear and clothing, you’ll really want to think about what it is you NEED. Things that can serve multiple purposes are a huge plus. Breaking your lists up further into essentials, semi-essentials and non-essentials is a good way to pare things down. Make sure to consider the environment that you’ll be in. Be prepared but as minimal as possible; perhaps you don’t need that pair of flip-flops or that fourth pair of socks.
If you’ll need to portage or boof a lot, then you’ll really need to think about shedding excess weight. If not, its more a matter of how much you can fit or how much you want to deal with. Trying to pack a boat to its gills every day can become quite a task, and a heavy boat takes more effort to paddle. But, don’t be scared to pack on the pounds if you want to (read: beer). My Dagger Katana 10.4 weighed in at over 160 pounds when I launched on the Grand and performed just fine.
For clothing, bring enough to stay sufficiently warm and dry. Bring all synthetic technical wear, unless you want to pack an extra set of cotton camp clothing. I personally like to bring 2 full pairs of technical clothing, plus a camp / hiking set. Again, see my complete gear list at the bottom of this post. I will also cover water filtration equipment and human and food waste disposal later in the post.
Make sure you have an ample first aid kit. Medicines like Dayquil/Nyquil, Ibuprofen and Imodium are good to have around in a pinch. Hand lotion, nail clippers, tweezers and a file are handy as well, as your hands tend to take a beating on long trips.

• Food:
Your food choice will largely depend on the length of your trip and your own personal taste. When thinking about food choices, remember that fat provides 9 calories per gram, whereas carbohydrates give you 4 calories per gram.
Many of my group opted to go with dehydrated backpacking meals from Mountain House Meals for their simplicity (add 2 cups boiling water!) and lightweight. Being a slightly more picky eater, I opted for slightly more “standard” foods like pastas, soups, and canned / cured meat. For breakfasts things like oatmeal, pancakes, and breakfast burritos with dehydrated eggs and cured meats were popular choices. Lunches mainly consisted of Babybel cheese wheels, nuts, cured meats, granola or energy bars, and chocolate or other candy. Dinners were largely pasta dishes, cous cous or rice dishes, or dehydrated soup mixes or ramen noodles. Root vegetables also keep well and can be added to almost any dish. For shorter trips, you can get away with perishable foods with the use of a kayak soft-cooler. You can also freeze meats and use them in the first few days of the trip. The easier the prep and cleanup, the better.
Pre-prepping and repackaging meals at home can be key and will help minimize trash you’ll have to carry out. Packing food in Zip-Loc bags come in handy for trash containers when empty. Bleach wipes, paper towels and a small dishtowel come in handy for quick cleanups. Hand sanitizer and baby or face wipes are also good to have along.
• Logistics:
As with any river trip, you’ll need to figure out how to get you and all your gear to and from the river. Compared to raft trips, your gear will be much more simple to haul, so trying to fit into fewer vehicles and utilizing a shuttle service can be an affordable option when split amongst multiple people. One word of caution: don’t transport your boats loaded. We ended up with some fairly large dents in our boats after leaving them semi-loaded on the return trip.
Use common sense and let people know where you’re going and when you plan to be back. Its never a bad idea to rent or borrow an emergency locator like the Garmin InReach (keep it on your person), and carry a copy of your insurance card and list of emergency contacts with you on your trip. Basic survival tools like minor first aid, map, compass, and waterproof matches are all good things to have on your person as well.
Start small and work your way up. Consider doing a trip you’re familiar with and is well within your comfort zone. Start with a 1 or 2 night trip and work up from there. Rivers like the San Juan from Sand Island to Mexican Hat, Ruby/Westwater or the Moab Daily on the Colorado, the Rio Chama in New Mexico, and Escalante Canyon of the Gunnison are all great stretches to do your first self-support on.

– Preparation –
• Packing:
Packing all your gear is a critical part of planning your trip. Plan it out, then test it before your trip. Figuring out that you can’t fit everything at the put-in is never any fun. Use nylon drybags and compression drysacks to save weight and space (be careful of outfitting screws when packing the boat!). I prefer to use smaller drybags in varying sizes of 6L to 15L range. The Watershed Ocoee also makes a great day and/or camera bag with the padded liner.
Think about how to organize your gear, both in your bags, as well as in the boat. Group like items together, keep items you’ll need during the day separate, try to keep weight towards the center or front of the boat. I like to pack my tent / tarp, sleeping bag, and clothing in the back of the boat, as they’re usually the lightest. I try to put heavier items and things that I won’t need to access during the day (stove, camp chair, dinner / breakfast food) in the bow. I keep my lunch, camera and day bag behind the seat for easy access.
Remember that not everything needs to go in a dry bag, and to utilize nooks and crannies between bags to stuff small things (or beer!) into. Be careful of sharp corners or outfitting screws that could tear your bags. Bring a pair of lightweight rigging gloves to protect your hands while packing (open wounds suck in the desert!) Do a full test pack/unpack. I also recommend doing a test run on your local run to get a feeling for paddling and rolling the loaded boat. Make sure that you’re in proper paddling shape before embarking on your trip.

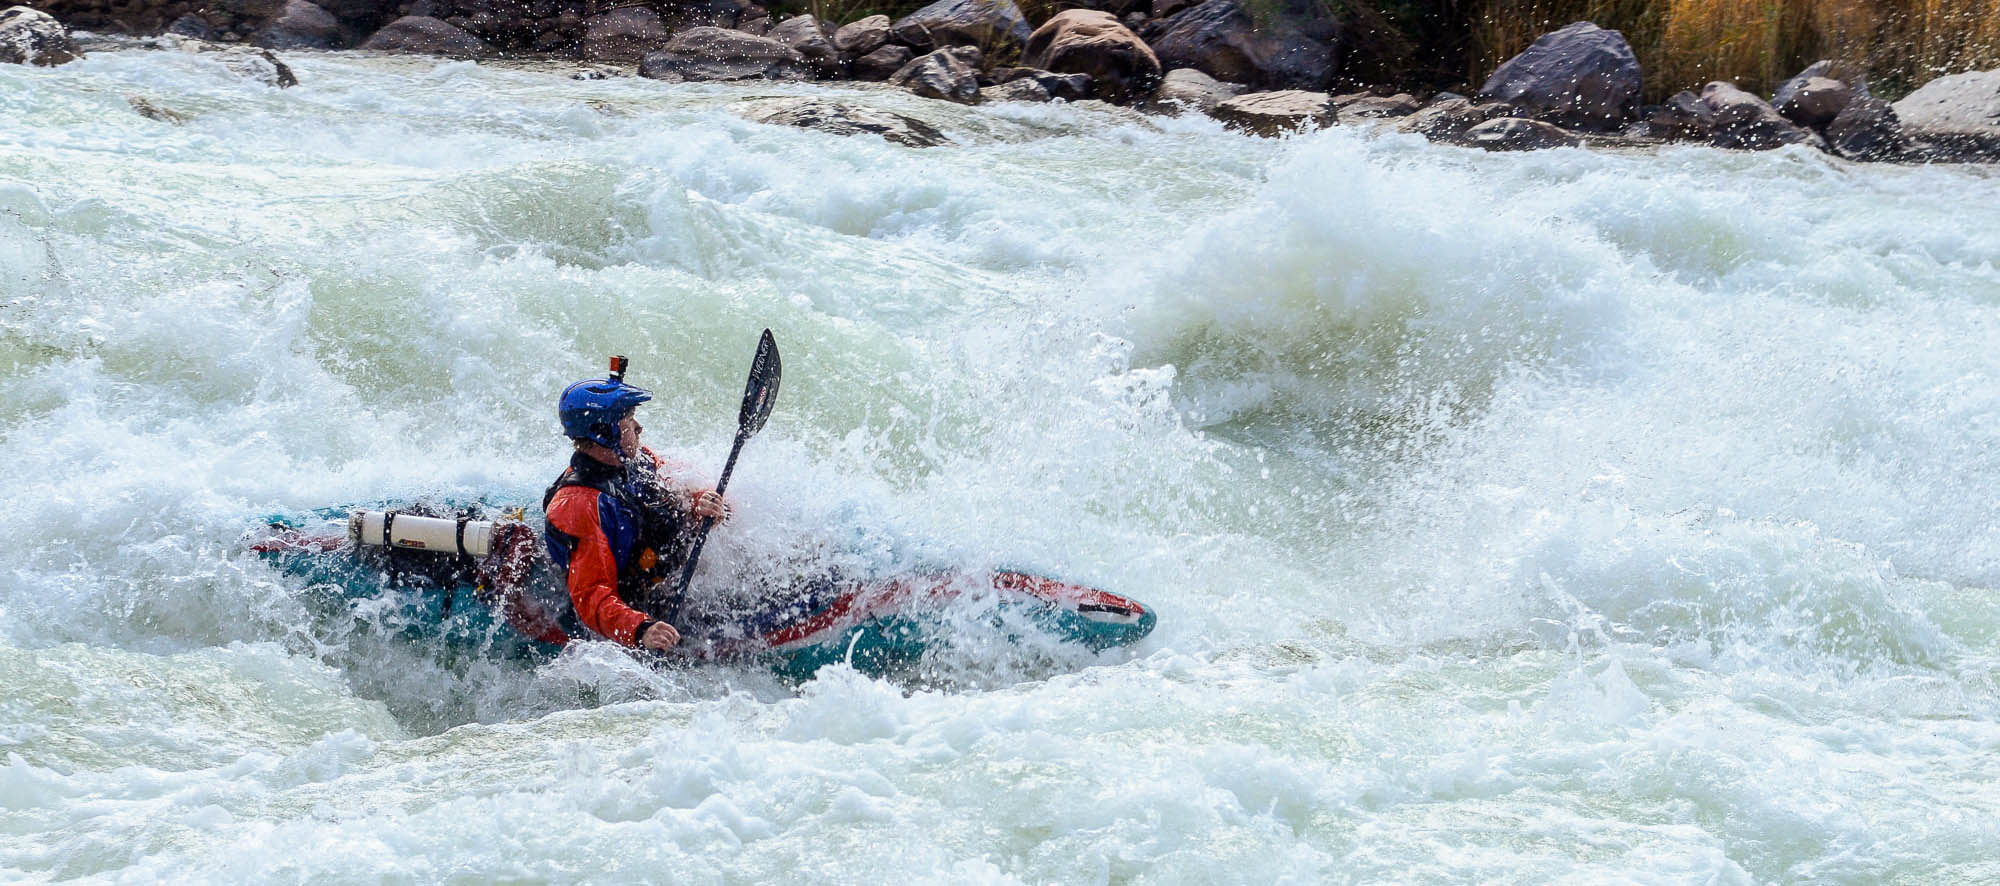
– On the Water –
After lots of planning and prep, you’re finally on the water! Woohoo! This is where you put all the hard work to use, so lets cover a few helpful tips and some essential guidelines for when you’re on the water.
Remote river canyons are some of the coolest places on Earth, but they also demand and deserve our respect. Use good common sense and err on the side of caution. Mistakes in the middle of nowhere can be a big deal and nature can be very unforgiving, so use extra caution. There’s no raft to sit on, should you get injured, on this trip! Have respect for your surroundings. Practice Leave No Trace ethics and leave the canyon better than you found it. Pack out all your trash and solid waste. Liquid waste goes into the river. Strain your dishwater and pack out your food wastes. Use a small kitchen tarp (which also helps keep sand out of your food). Be respectful of your environment so that others can enjoy it as well.
Stay dry and warm! Try to keep your gear as dry as possible. Don’t forget about dew point and condensation, which can easily soak you if you sleep under the stars uncovered. Keeping sand out of your gear is an art form that can only be learned by experience. Bringing a small sand mat or ground tarp is very helpful.
Filtering drinking water will be one of the biggest considerations during your trip. On most rivers, pulling water from the main channel is recommended as side channels can have more concentrated contaminants. Having a few collapsible buckets like the Jacks Plastic Water Bucket are key for settling water on the muddy desert rivers we have around Durango. Water flocculants will help with the settling process, and using AquaMira before filtering will help with making sure your water is good to drink. Take care with decanting if you’re using a gravity filter to extend your filter life. Don’t lift the bucket after it’s settled! We went through 4 filters for our Katadyn 10L Base Camp gravity filter system for 6 people / 10 days on the Grand, even with careful decanting. Use paddles to make a tripod on tree-less beaches.

For the groover (or poop tube), I used a lightweight 18in x 4in PVC sewer pipe with a cap on one end and a screw fitting on the other. Inside, I made a foam stopper on a string to compact and separate the waste from my tp, hand sanitizer and unused Wag Bags. It weighed in at less than 2 lbs using the lightweight pipe, but I would go to 20” if I were to do it again. The “rule of thumb” is 40 cubic inches per day. With a 4” pipe, I think 2” of length per day is ideal.
Our aluminum break-down firepan is roughly based on Boyce Greer’s design, with a few modifications to make for easier packing and assembly. It meets current regulations for most river trips, including the Grand, but double-check your area’s regulations before assuming. A fire-blanket may also be required.
Protect your food! Especially on popular rivers like the Grand, rodents and other creatures are a legitimate concern. Keep your food inside your boat with the hatch or cockpit cover on, which is good for keeping critters and insects out of your boat and gear. In bear country, elevate your food in a tree.
Keep essential items close at hand. I keep my small first aid / emergency kit, sunblock, snacks and camera in my day bag for easy access and for hiking. Bring an extra pair of sunglasses. Keep your throwbag or any other rescue hardware easily accessible and/or on your person. Stay hydrated!
That’s it! Have fun, be safe, take lots of pictures, make lots of memories!
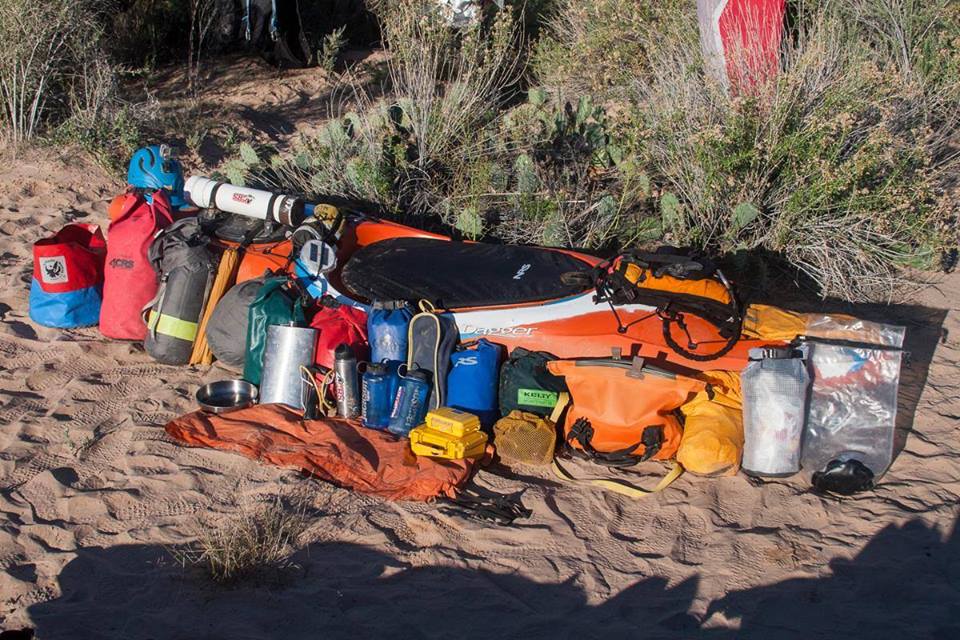
Self-Support Kayak Gear List:
Below is a list of items we brought for our 10-day Grand Canyon self-support kayak trip in early November. Temperatures ranged from low 40’s to mid 70’s. Keep in mind that this is not a definitive list and you need to assess the proper gear for the conditions you’ll be paddling in. I’ve organized this trip by bag or container to help you to plan on how to organize your gear.
Paddling Gear:
- Kayak – Dagger Katana 10.4 with Jackson Hard Hat Hatch Cover (read our Dagger Katana review here)
- Paddle – Werner Stikine Straight Shaft
- Rescue PFD – Stohlquist Descent with Add-A-Buoy
- Dry Suit – Kokatat GoreTex Icon
- Skirt – Snap Dragon WW EXP
- Helmet – Sweet Rocker
- Base layers –
- Top – IR Thick Skin or NRS H2Core Lightweight Shirt
- Bottom – NRS H2Core Lightweight Pants
- River Shoes – Astral Brewer
- Swim Shorts – IR Guide Short
- Skull Cap or Hood – IR Thermo Cap or NRS Storm Hood
- Wool Socks
- Pogies or Gloves – IR Pogies
- Throw Bag – NRS Compact Rescue
- Sunglasses
Everything Else:
Front of Kayak / Bow:
- Group Shelter: Kelty Noahs Tarp 12
- Camp Stove: GSI Glacier Cook Set inside NRS TuffSack 6L
- Camp Chair: TravelChair Joey Chair
- Breakfast / Dinner Food Bag: NRS 22L TuffSack (OR Lightweight Dry Bags are preferable)
- 10 Breakfasts (oatmeal, pancakes)
- 9 Dinners (pastas, soups, grains, canned / cured meats)
- Water Bucket: Jacks Plastic Collapsible Water Bucket
- Water Bag: 4L MSR Dromedary
- Flask: 64oz of Bulleit Rye Whiskey
Back of Kayak / Stern Hatch:
- Clothing Bag: NRS MightyLight Dry Bags or OR Lightweight Dry Bags
- 2 full sets of camp clothing, all synthetic. (NRS H2Core Lightweight and Silkweight Hoodies, NRS Lolo Pants)
- Compression Sack: OR AirPurge Dry Compression Sack
- Sierra Designs Zissou 6 Dry Down Sleeping Bag
- Sierra Designs Transendant Down Jacket
- Inflatable Camp Pillow
- Tent Bag: OR Lightweight Dry Bag
-
Pelican 1150 Dry Case
- Headlamp
- Portable Charger
- Spare Batteries
- Emergency Contacts, Driver License, Insurance Card
- Ipod & headphones
- Trash Bag – Gallon ZipLocs inside of an old drybag
- Fry Pan
- Sand Mat – 3×3
- Thermos
- Misc Dry Bag – 10L NRS Dri-Stow
- Toiletries
- Camp Towel
- Lucie Solar Lantern
- Journal
- Playing Cards
- Pocket Knife
- Trowel
- Bleach wipes, paper towels & hand sanitizer
- Book
- Speaker – EcoXGear Pebble
- TheraCane
- Slingshot
- NRS Dri-Stow 10L for camp shoes
- Cockpit Cover
In the Cockpit:
- Lunch Bag: NRS 10L Tuff Sack
- 10 days worth of cured meats, wax cheese wheels, nuts, GORP, Cliff Bars, Chocolate & Candy
- Day Gear Bag: NRS 6L Tuff Sack
- Rain Jacket
- Fleece hat
- Baseball cap
- Spare Sunglasses
- Rigging Gloves – NRS Cove Glove
- Day / Camera Bag: Watershed Ocoee Duffel with Padded Liner
- Digital SLR Camera with 2 lenses
- Mini tri-pod
- Memory Cards & Lens Pen
- Small First-Aid
- Sunblock
- Snacks
- Day Wag Bag
- Break-down Kayak Paddle – Werner Sherpa 4-piece (tucked between seat mounts and hull)
- Bilge Sponge
- Water bottles – 2x Nalgene 2L bottles
- Groover – Strapped to the top of the stern
- MORE BEER!
Group Gear: Dispersed amongst the group
- Emergency Signal Panels / Signal Mirror
- Fire Pan & Fire Blanket
- Major First Aid
- Kayak Repair Kit – duct tape, super glue, Aquaseal, Tenacious Tape, spare gaskets, spare outfitting bolts and screws, bituthene. PVC for drybags.
- Water Filters & Water purification (flocculant & AquaMira)
- Dish kit – Sponge, Bleach, Soap, Strainer
- Pin Kit
- Spare PFD